In the realm of software development, upholding code quality and consistency stands as a fundamental requirement. This article will guide you through the process of setting up ESLint, Stylelint, and other linters within a basic project. Furthermore, we'll harness the power of GitHub Actions to automate the code linting process, ensuring that you not only possess a strong grasp of configuring code linting with GitHub Actions but also the capability to automate multiple facets of your software development workflow.
Init simple project
Let's set up a simple project to see how it works!
npm init -yInstall ESLint. ESLint is a tool for identifying and reporting on patterns found in JavaScript code.
npm install eslint -DEESLint configuration file example:
# .eslintrc.yml

env:
  es2021: true
  browser: true

extends:
  - eslint:recommended

parserOptions:
  ecmaVersion: 2021
  sourceType: module
Also, do not forget to update the scripts section in the package.json.
// scripts in package.json

{
  "scripts": {
    "lint:js": "eslint src/**/*.js",
    "lint": "npm run lint:js"
  }
}
Github Actions in general
Github Actions are commands for github to run some code every time an event occurs (Push, Merge, PR and etc.). The code runs on github virtual machines.
What does this code do? Anything. It allows you to automate things necessary for your development process: run tests/lints, deployment, and notify people.
Github Actions give a nice and free CI/CD and also allow you to create a flexible and easily configurable system for development.
Let's look at a simple example — for each push to one of the environment branches (development, staging, production) we will run linting (example will use JavaScript).
Action Example:
# .github/workflows/lint.yml

name: Lint # name of the action (displayed in the github interface)

on: # event list
  pull_request: # on a pull request to each of these branches
    branches:
      - development
      - staging
      - production

env: # environment variables (available in any part of the action)
  NODE_VERSION: 14

jobs: # list of things to do
  linting:
    name: Linting # job name (unique id)
    runs-on: ubuntu-latest # on which machine to run
    steps: # list of steps
      - name: Install NodeJS
        uses: actions/setup-node@v2
        with:
          node-version: ${{ env.NODE_VERSION }}

      - name: Code Checkout
        uses: actions/checkout@v2

      - name: Install Dependencies
        run: npm ci

      - name: Code Linting
        run: npm run lint
Steps syntax
name— needed to be displayed in the github interface;uses— specify the name of custom actions if we want to use it. You can find many ready-made actions in the marketplace;with— parameters for custom actions;run— runs commands in theshell. It is forbidden to use a shell commands with custom actions.
That's it, we took apart a small but useful example of the github action!
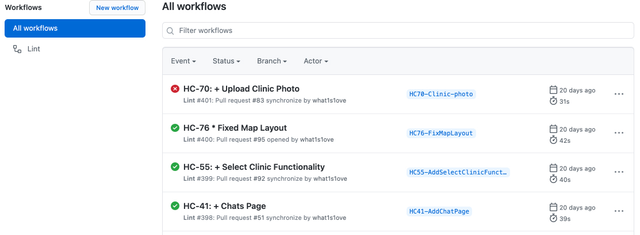
In the github interface, the runs will look like this:


Branch protection
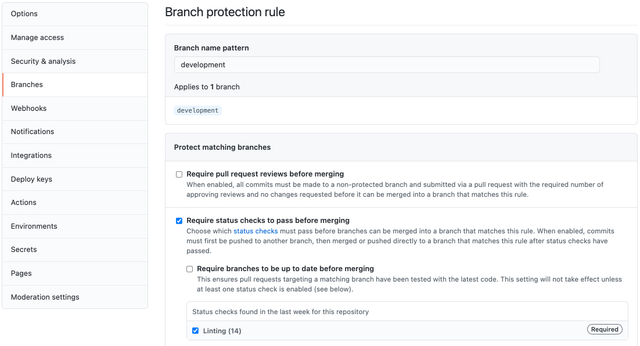
To prohibit merging a pull request when linting fails, go to the repository settings and set the merge rules for the branch you want.
To do this we need to check the Require status checks to pass before merging checkbox and select the checks we need. In our case, this is Linting (the name is taken from the action config).

Now in each pull request to the branch we need we will see the result of the action. If all is well, the action will be passed:

But if we broke something the action will fail:

Inside each action we can find out what exactly went wrong. For example, here the action tells us that there are unused variables in the code:

Linting other files
For now, we only check the format of the js files. It is not very good. Attention should be paid not only to js files, as there are usually other file formats that developers pay less attention to. Let's fix this and add additional linters to protect our code.
Stylelint
Stylelint is a mighty, modern linter that helps you avoid errors and enforce conventions in your styles.
I use a simple example in which I just extend the config from the recommended. But even with this couple of lines we will protect our styles.
Stylelint supports a huge number of configuration options. Be sure to check the documentation to find the rules that fit your project.
npm install stylelint stylelint-config-standard -DEStylelint configuration file example:
# .stylelintrc.yml

extends:
  - stylelint-config-standard
Updated package.json:
// scripts in package.json

{
  "scripts": {
    "lint:css": "stylelint src/**/*.css",
    "lint:js": "eslint src/**/*.js",
    "lint": "npm run lint:css && npm run lint:js"
  }
}
EditorConfig Lint
EditorConfig helps maintain consistent coding styles for multiple developers working on the same project across various editors and IDEs.
npm install editorconfig-checker -DEEditorConfig configuration file example:
# .editorconfig

root = true

[*]
indent_style = space
indent_size = 2
end_of_line = lf
trim_trailing_whitespace = true
insert_final_newline = true
charset = utf-8
Updated package.json:
// scripts in package.json

{
  "scripts": {
    "lint:editorconfig": "editorconfig-checker",
    "lint:css": "stylelint src/**/*.css",
    "lint:js": "eslint src/**/*.js",
    "lint": "npm run lint:editorconfig && npm run lint:css && npm run lint:js"
  }
}
Ls Lint
Ls-lint — file and directory name linter. Bring some structure to your project directories.
npm install @ls-lint/ls-lint -DELs Lint configuration file example:
# .ls-lint.yml

ls:
  .dir: kebab-case
  .js: kebab-case
  .css: regex:([.a-z]*)([-.][a-z]+)*

ignore:
  - node_modules
  - .git
Updated package.json:
// scripts in package.json

{
  "scripts": {
    "lint:ls": "ls-lint",
    "lint:editorconfig": "editorconfig-checker",
    "lint:css": "stylelint src/**/*.css",
    "lint:js": "eslint src/**/*.js",
    "lint": "npm run lint:ls && npm run lint:editorconfig && npm run lint:css && npm run lint:js"
  }
}
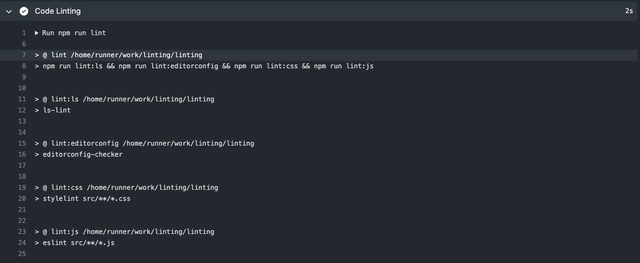
Now 4 linters will run for each pull request. I hope you and your team will follow and improve the linters configs. And you will always see the linter result without errors:

Pricing
Github actions are not free. Now the free plan gives ~2000 minutes. Usually this is enough for small and medium projects.
You can always find up-to-date information on the use-plan here.
Conclusions
You know the basics of Github Actions now, and I hope this article clarifies all of the basic principles.
This example does not cover all the opportunities. Github has a wonderful documentation, which describes many interesting things!
Linting code is just an example. Everything can be automated.
Some examples:
Running tests on each pull request;
Deploying on push to production branch;
Prettify your code before merging;
Publishing packages;
Sending notifications on each pull request/issue, etc.